0141 332 5639
Battle of Assaye
1803
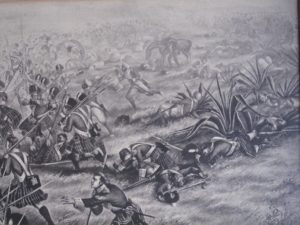
Five thousand British troops under command of Sir Arthur Wellesley, later the Duke of Wellington, took on the Mahratta’s forty-two thousand-strong army at the Battle of Assaye. The 74th Highlanders defended the position alongside The 78th Highlanders, The 19th Light Dragoon and various battalions of Sepoys; holding the ground with heavy losses.
Towards the end of the battle, including the Quarter-Master, James Grant, having to fight, only 80 men of The 74th were accounted for – every Officer was either killed or wounded. In one company of 50 men, 48 were killed!
Wellesley never forgot the battle or the casualties inflicted on his troops, particularly The 74th. Many years later, a friend asked him what was the best thing in which he had ever taken part, in the way of fighting. ‘Assaye’, replied the Duke of Wellington – he did not add a word!
The Mahratta War was one of the most important in a series of small wars and campaigns which ended with the acquisition of the whole of India by the British Crown. It was fought by a small British force in alliance with one of the Mahratta Chieftains, Scindia and the Rajah of Berar, forces which were trained and led by French officers . The Mahratta territory where the fighting took place lies in the centre of India, to the North of Hyderabad.
The British/Indian force was under the command of Major General Sir Arthur Wellesley, later to become the Duke of Wellington. The 74th Highlanders formed part of the 5,000 men strong force which included some 2,000 cavalry, Sepoy (Indian soldiers) and only two other British Regiments, the 78th and the 19th Light Dragoons .
Wellesley decided to take the initiative and defeat his opponents by out-marching them, capturing their fortresses and bases, forcing them into battle. To achieve this there was forced marching.
They were occupying an immensely strong position on an open plain with a village protecting either flank and the river Kaitna in front of them. To withdraw could well have had serious consequences for his campaign so Wellesley decided to attack, despite the odds against him. A frontal assault across the river in the face of the guns was impracticable, but by skilful reading and use of the ground he managed to force the enemy flank and cross the river, although this was achieved under heavy fire.
The huge enemy army changed direction – no mean feat and a tribute to its French commanders; and, once again faced the British troops, confident of destroying his attack.
The fortified village of Assaye was now on his right flank; and sited there was a large concentration of artillery protected by a mass of cavalry. Appreciating that the enemy’s weakest point in their seven- mile-long position was their right centre, and should this give way the battle was his, Wellesley launched his attack against it, with both British battalions in the main assault: The 78th on the left and The 74th on the right.
In front and to the right of The 74th had posted picquets to protect the right flank – these were small temporary military posts closer to the enemy than the main formation . The Officer in command had specifically been ordered not to approach Assaye, with its guns and horsemen; and The 74th were ordered to support the picquets.
Under intense artillery fire, the attack began. On the left, the day went well, The 78th and Sepoys broke through the enemy centre. On the right, there was near disaster. In spite of his orders and for unknown reasons, the Officer commanding the picquets led his men straight up to the village of Assaye. The 74th, obeying their orders, followed the picquets. The Regiment was unsupported and exposed to an extremely heavy cannonade; and then charged repeatedly by cavalry, sustaining terrible losses. Hoever, they still maintained their position and the right flank of Wellesley’s army remained intact.
In this action, the keenest ever fought in India, every officer present with the Regiment was either killed or wounded, except Quartermaster James Grant, who, when he saw so many of his friends fall in battle, resolved to share their fate and, though a non-combatant , joined the ranks and fought until the end of the action. The Regiment was saved from annihilation by a charge of The 9th Light Dragoons, which succeeded in driving the enemy back. Their failure to destroy The 74th, coupled with the success of The 78th and Sepoys, caused the enemy to break and run leaving 6,000 casualties and almost all their fine brass cannon on the battlefield.
The 74th was led out of action by Quartermaster Grant and Major Swinton, who had been wounded. Only about eighty men were able to answer their names, from a force of five hundred. In one company, all the Officers and forty-four men out of fifty were killed.
But the Regiment had not given way! If they had, the battle would have been lost and probably the campaign as well.
Their commander never forgot the battle or the casualties inflicted on his troops, principally The 74th, whom he dubbed “My Fighting Regiment”! Many years later, a friend asked him what was the best thing in which he had ever taken part, in the way of fighting. ‘Assaye’, replied the Duke of Wellington. He did not add a word.
The Governor General in India ordered in Council that special honorary colours be presented to the three British Regiments which took part in the battle. The Regiment has carried the Assaye Colour ever since and when it is trooped on Assaye Day, it is carried to the parade by the Quartermaster in memory of Quartermaster Grant who fought so gallantly – a great honour, as Colours are usually carried by Ensigns or young Officers.